Ceph 提供了很好的接口可以让 OpenStack 使用来作为其 Glance, Cinder, Cinder Backup 和 nova 服务的后端. 本篇主要介绍如何配置 Ceph 和 OpenStack 让两者协同工作, 主要内容搬运自 RedHat
Table of Contents Prerequisites 创建 Ceph 池 安装和配置 Ceph 客户端 拷贝 Ceph 配置文件到 OpenStack 节点 配置 Ceph Client 认证 配置 OpenStack 使用 Ceph 配置 Cinder 设置 Cinder Backup 配置 GLANCE 配置 NOVA 更改 Ceph 配置文件 重启 OpenStack 服务 测试 Ceph 与 OpenStack Prerequisites
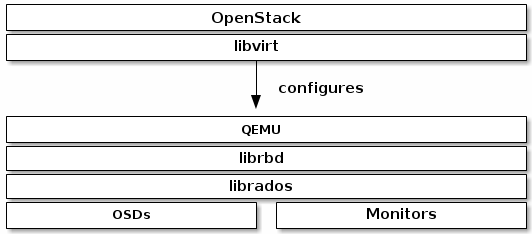
本文档主要介绍配置 Ceph, QEMU, libvirt 和 OpenStack 使用 Ceph 作为后端存储服务.
为了使用Ceph 块存储作为OpenStack 后端,我们需要
一个正常运行的 Ceph cluster
至少一个OpenStack 节点
OpenStack 服务有三部分是与 Ceph 块存储整合在一起的,
镜像(images): OpenStack Glance 管理 虚拟机的镜像.
卷(volumes): 卷是块设备. OpenStack 使用卷来启动虚拟机,或者将卷附加到运行的虚拟机上.
访客硬盘(Guest Disks): 访客硬盘是访客操作系统的硬盘. 一般当虚拟机起动时,其硬盘会出现在管理系统的文件系统中(通常在 /var/lib/nova/instances/<uuid>/</uuid>之下)
OpenStack Glance 能够将镜像存储为一个 Ceph 块设备, 能够使用 Cinder 通过一个镜像的写时拷贝克隆镜像来起动虚拟机. Ceph 并不支持 QCOW2 格式的虚拟机硬盘. 为了支持从Ceph中起动虚拟机, Glance 镜像必须是 RAW 格式.
OpenStack 可以使用 Ceph 作为镜像,巻,或访客硬盘的存储, 可以只用作部分的,也可以用作全部的.
创建 Ceph 池
默认 Ceph 块设备会使用 rbdCinder, Cinder Backup, Glance 和 Nova 创建存储池. 根据情况更改 pg 值(可参考 Ceph Pools 中 PG 和 PGP 的设置 )
1 2 3 4 5 $ ceph osd pool create volumes 128; rbd pool init volumes $ ceph osd pool create backups 128; rbd pool init backups $ ceph osd pool create images 128; rbd pool init images $ ceph osd pool creaate vms 128; rbd pool init vms
如果 Ceph 显示 application not enabled on <x> pool(s) 等类似的 Warning,需要启用 Pool 的 rbd 属性
1 $ for i in volumes backups images vms; do ceph osd pool application enable $i rbd; done
安装和配置 Ceph 客户端
nova-compute, cinder-backup 和 cinder-volume 节点需要Python bindings 和客户端的命令行工具.
1
2
$ sudo yum install -y python-rbd $ sudo yum install -y ceph-common
glance-api 节点则只需要安装 python-rbd 即可.
拷贝 Ceph 配置文件到 OpenStack 节点
运行着 glance-api, cinder-volume, cinder-backup 和 nova-compute 的节点相当于 Ceph 的客户端, 因而需要 Ceph 的配置文件, 将其拷贝到所有的 OpenStack节点上.
1 $ scp /etc/ceph/ceph.conf osp:/etc/ceph/ceph.conf
配置 Ceph Client 认证
在一个 Ceph mon 节点上, 为 Cinder, Cinder-Backup, Glance 和 Nova 建立各自的账号.
1
2
3
4
$ ceph auth get-or-create client.cinder mon 'allow r' osd 'allow class-read object_prefix rbd_children, allow rwx pool=volumes, allow rwx pool=vms, allow rx pool=images' $ ceph auth get-or-create client.backup mon 'allow r' osd 'allow class-read object_prefix rbd_children, allow rwx pool=backups' $ ceph auth get-or-create client.glance mon 'allow r' osd 'allow class-read object_prefix rbd_children, allow rwx pool=images' $ ceph auth get-or-create client.nova mon 'allow r' osd 'allow class-read object_prefix rbd_children, allow rwx pool=vms, allow rx pool=images'
然后分别将 client.cinder, client.backup, 和 client.glance 三个密钥分发到相应的节点上.
1
2
3
4
5
6
7
8
9
$ ceph auth get-or-create client.cinder | ssh cinder-volume-server sudo tee /etc/ceph/ceph.client.cinder.keyring $ ssh cinder-volume chown cinder:cinder /etc/ceph/ceph.client.cinder.keyring $ ceph auth get-key client.cinder | ssh {cinder-node} tee client.cinder.key $ ceph auth get-or-create client.backup | ssh cinder-backup-server tee /etc/ceph/ceph.client.backup.keyring $ ssh cinder-backup-server chown cinder:cinder /etc/ceph/ceph.client.backup.keyring $ ceph auth get-or-create client.glance | ssh glance-api-server sudo tee /etc/ceph/ceph.client.glance.keyring $ ssh glance-api-server chown glance:glance /etc/ceph/ceph.client.glance.keyring $ ceph auth get-or-create client.nova | ssh nova-compute-server tee /etc/ceph/ceph.client.nova.keyring $ ssh nova-compute-servers chown nova:nova /etc/ceph/ceph.client.nova.keyring
在控制节点上,
1
2
3
4
5
6
7
8
9
10
11
12
$ ssh {cinder-manager-node} $ uuidgen > cinder.uuid.txt <secret ephemeral='no' private='no' > <uuid>`cat cinder.uuid.txt`</uuid> <usage type ='ceph' > <name>client.cinder secret</name> </usage> </secret> $ sudo virsh secret-define --file cinder.xml $ sudo virsh secret-set-value --secret $(cat cinder.uuid.txt) --base64 $(cat /etc/ceph/client.cinder.key)
nova-compute 节点需要 client.nova 的密钥, libvirt 进程需要它在附加一个块设备时访问 Ceph 集群.
1 $ ceph auth get-key client.nova | ssh {your-compute-node} tee client.nova.key
在计算节点上, 为密钥生成一个 UUID, 并保存到文件以便稍后对计算节点进行设置.
1
2
$ ssh nova-compute-node $ uuidgen > nova.uuid.txt
注意, 为了保持一致性,最好所有计算节点上的UUID一样.
1 2 3 4 5 6 7 8 9 10 <secret ephemeral='no' private='no' > <uuid>`cat nova.uuid.txt`</uuid> <usage type ='ceph' > <name>client.nova secret</name> </usage> </secret> $ virsh secret-define --file nova.xml $ virsh secret-set-value --secret $(cat nova.uuid.txt) --base64 $(cat client.nova.key)
计算节点上也需要 client.cinder 的密钥和 cinder.xml. 将 client.volumes.key, cinder.uuid.txt 和 cinder.xml 复制到计算节点
1
2
$ sudo virsh secret-define --file cinder.xml $ sudo virsh secret-set-value --secret $(cat cinder.uuid.txt) --base64 $(cat /etc/ceph/client.cinder.key)
配置 OpenStack 使用 Ceph
配置 Cinder
cinder-volume 节点需要 Ceph 块设备驱动, 卷池, 用户,和 密钥的 UUID来与 Ceph 块设备来进行交互. 我们依次进行设置.
修改 Cinder 配置文件, 在 [Default] 小节, 设置 Ceph 为 cinder 后端.
1
2
3
4
$ vim /etc/cinder/cinder.conf $ enabled_backends = ceph
设置 Glance API 版本为 2. 如果有多个 cinder backend, 下面一行设置必须在 [Default] 区.
更改 default_volume_type 为 ceph:
1 2 default_volume_type = ceph
或者
1 $ openstack-config --set /etc/cinder/cinder.conf DEFAULT enabled_bacends ceph
在/etc/cinder/cinder.conf 配置文件中, 创建 [ceph] 小节, 设定 volume_driver 使用 Ceph 块设备驱动.
设定 volume_driver 使用 Ceph 块设备驱动.
1
2
3
4
5
6
7
8
9
10
11
12
13
14
[ceph] volume_driver = cinder.volume.drivers.rbd.RBDDriver volume_backend_name = ceph rbd_cluster_name = ceph rbd_pool = volumes rbd_ceph_conf = /etc/ceph/ceph.conf rbd_flatten_volume_from_snapshot = false rbd_max_clone_depth = 5 rbd_store_chunk_size = 4 rados_connect_timeout= -1 glance_api_version = 2 rbd_user = cinder rbd_secret_uuid = <your_secret_uuid> rbd_store_ceph_conf=/etc/ceph/ceph.conf
建议去掉 配置中 默认的 [lvm] 内容.
创建 volume default type [optional]. 可以在生成不同 type, 在创建 volume 时 指定 --volume-type:
1
2
3
4
5
6
7
8
$ cinder type-create ceph $ cinder type-key ceph set volume_backend_name=ceph $ cinder type-list +--------------------------------------+------+-------------+-----------+ | ID | Name | Description | Is_Public | +--------------------------------------+------+-------------+-----------+ | 029f36ba-e507-47b2-b34a-04d3d5dc805c | ceph | - | True | +--------------------------------------+------+-------------+-----------+
设置 Cinder Backup
cinder-backup 节点需要一个特别的守护进程. 按照以下步骤对cinder-backup 进行配置.
打开 Cinder 配置文件, 并跳到 [ceph] 小节.
1 $ vim /etc/cinder/cinder.conf
设定 backup_driver 为 Ceph 驱动.
1 backup_driver = cinder.backup.drivers.ceph
设定 backup_ceph_conf 为 Ceph 集群的配置文件.
1 backup_ceph_conf = /etc/ceph/ceph.conf
指定存储备份的 Ceph 池.
1 backup_ceph_pool = backups
指定 cinder_backup 与 Ceph 交互的用户.
1 backup_ceph_user = cinder-backup
其它的一些设置
1
2
3
4
backup_ceph_chunk_size = 134217728 backup_ceph_stripe_unit = 0 backup_ceph_stripe_count = 0 restore_discard_excess_bytes = true
检查 Cinder Backup 是否已启用, 没有则启用 Cinder Backup
1
2
3
$ cat /etc/openstack-dashboard/local_settings*|grep enable_backup $ sed -i "s|'enable_backup': False|'enable_backup': True|g" /etc/openstack-dashboard/local_settings*
配置 GLANCE
修改 GLANCE 的配置文件/etc/glance/glance-api.conf 以使用 Ceph 块设备. 取消下面注释的配置, 并根据实际情况更改相应的值.
1
2
3
4
5
6
stores = rbd default_store = rbd rbd_store_chunk_size = 8 rbd_store_pool = images rbd_store_user = glance rbd_store_ceph_conf = /etc/ceph/ceph.conf
启用 copy-on-write(COW) 克隆功能
1 show_image_direct_url = True
如需要,关闭 cache management 功能, flavor 应该只设置为 keystone, 而不是 keystone+cachemanagement
如需要, 可以对镜像设置下面的属性
1
2
3
4
hw_scsi_model = virtio-scsi hw_disk_bus = scsi hw_qemu_guest_agent = yes os_require_quiesce=yes
配置 NOVA
我们需要修改每一个 nova-compute 节点上的 Ceph 配置文件, 让Nova 直接从 Ceph 中起动所有虚拟机.
打开 Ceph 配置文件, 在[client] 区加入以下内容.
1
2
3
4
5
rbd cache = true rbd cache writethrough until flush = true rbd concurrent management ops = 20 admin socket = /var/run/ceph/guests/$cluster -$type .$id .$pid .$cctid .asok log file = /var/log /ceph/qemu-guest-$pid .log
为 admin socket 和日志文件建立相应的目录, 并赋予相应的权限.文件夹需要在 SELinux 或 AppArmor 中得到允许.
1
2
$ mkdir -p /var/run/ceph/guests/ /var/log /ceph/ $ chown qemu:libvirt /var/run/ceph/guests /var/log /ceph
为 KVM 访问 Ceph 生成一个密码
1
2
3
4
5
6
7
8
9
10
11
$ uuidgen |tee /etc/ceph/nova.uuid.txt $ cat >> /etc/ceph/nova.xml << EOF <secret ephemeral="no" private="no"> <uuid>`cat /etc/ceph/nova.uuid.txt`</uuid> <usage type="ceph"> <name>client.volumes secret</name> </usage> </secret> EOF $ virsh secret-define --file /etc/ceph/nova.xml $ virsh secret-set-value --secret `cat /etc/ceph/nova.uuid.txt` --base64 $(cat ~/client.nova.key)
配置 nova. 在 /etc/nova/nova.conf 文件的[libvirt] 区,修改如下配置.
1
2
3
4
5
6
7
8
9
10
11
12
13
14
force_raw_images = true disk_cachemodes = writeback [libvirt] images_type = rbd images_rbd_pool = vms images_rbd_ceph_conf = /etc/ceph/ceph.conf rbd_user = nova rbd_secret_uuid = your_nova_secret_uuid inject_password = false inject_key = false inject_partition = -2 live_migration_flag="VIR_MIGRATE_UNDEFINE_SOURCE,VIR_MIGRATE_PEER2PEER,VIR _MIGRATE_LIVE,VIR_MIGRATE_PERSIST_DEST,VIR_MIGRATE_TUNNELLED" hw_disk_discard = unmap
your_nova_secret_uuid 即为前面生成的密钥 UUID (nova.uuid.txt).
更改 Ceph 配置文件
在 /etc/ceph/ceph.conf 文件后面加上下面的内容, 并同步到 Ceph 集群其他节点上.
1
2
3
4
5
6
7
8
9
[client.glance] keyring = /etc/ceph/ceph.client .glance .keyring [client.cinder] keyring = /etc/ceph/ceph.client .cinder .keyring [client.cinder-backup] keyring = /etc/ceph/ceph.client .cinder-backup .keyring
重启 OpenStack 服务
在配置完相关设置后, 为了激活 Ceph 块设备驱动, 将块设备池名字和 Ceph 用户名字载入配置中, 我们需要重启相应的 OpenStack 服务.
1
2
3
4
$ systemctl restart openstack-cinder-volume $ systemctl restart openstack-cinder-backup $ systemctl restart openstack-glance-api $ systemctl restart openstack-nova-compute
测试 Ceph 与 OpenStack
Cinder 创建 Volumes
1 2 $ cinder create --display_name test_image 300
Nova 挂载 Volume
1 2 3 4 5 6 7 8 9 10 11 12 13 14 15 16 17 18 19 20 21 22 $ nova volume-attach <vm-id> <vol-id> $ nova list ... ... | 0eb4c5a4-6b14-48e0-8e27-3de7e73736d8 | test01 | ACTIVE | - | Running | Vtest=192.168.8.20 | ... ... $ cinder list ... | 4d26da85-e334-48d9-895b-13923349ee37 | available | test_image | 300 | - | false | | ... $ nova volume-attach 0eb4c5a4-6b14-48e0-8e27-3de7e73736d8 4d26da85-e334-48d9-895b-13923349ee37 +----------+--------------------------------------+ | Property | Value | +----------+--------------------------------------+ | device | /dev/vdb | | id | 0eb4c5a4-6b14-48e0-8e27-3de7e73736d8 | | serverId | 354af535-2425-49b4-979e-baffs15ed824 | | volumeId | 4d26da85-e334-48d9-895b-13923349ee37 | +----------+--------------------------------------+